WordPress Tutorials
How to Redirect a Page or URL in WordPress (2 Simple Methods)
Jun
Last Updated on June 24, 2024 by Jérôme Kerviel
Do you need to redirect a page or URL in WordPress?
When a user clicks on a link to your website that leads to a page that no longer exists, they will encounter an error message, often known as a 404 error. This poor user experience can be frustrating for your visitors, potentially driving them away and preventing them from becoming clients or customers.
To prevent this, it’s essential to manage broken links effectively by setting up redirects. Redirecting broken or outdated links ensures that users are seamlessly guided to the correct content, enhancing their experience on your site and maintaining their interest.
In this article, we’ll guide you through two simple methods for redirecting pages and URLs in WordPress, helping you to keep your site user-friendly and your visitors engaged.
Why Redirect a Page or URL in WordPress?
Redirecting pages or URLs in WordPress is crucial for several reasons:
- Maintain Seamless Navigation: Links are essential for connecting related pages on your WordPress website. When visitors encounter broken links, it disrupts their browsing experience. Redirecting these links ensures that users can navigate your site effortlessly, finding the information they need without hitting dead ends.
- Enhance User Experience: When a user clicks on a link that leads to a non-existent page, they will see an error message, typically a 404 error. This can be frustrating and may discourage them from staying on your site. By setting up redirects, you provide a smooth and frustration-free experience, which can keep visitors engaged and encourage them to explore more of your content.
- Preserve SEO Rankings: Search engines like Google crawl your site to index your content. Broken links can hinder this process, potentially impacting your search engine rankings. Redirecting outdated or broken URLs helps search engines index your site correctly, ensuring that your content remains discoverable and that you maintain your SEO performance.
- Prevent Lost Traffic: If you’ve moved content to a new URL or deleted a page, any existing links pointing to the old URL will result in errors. Redirects ensure that visitors who click on old links are automatically taken to the correct, updated content. This helps retain traffic and minimizes the risk of losing potential clients or customers.
However, broken links lead to a URL that doesn’t exist on your website. When this happens, a frustrating 404 ‘Page Not Found’ error message appears.
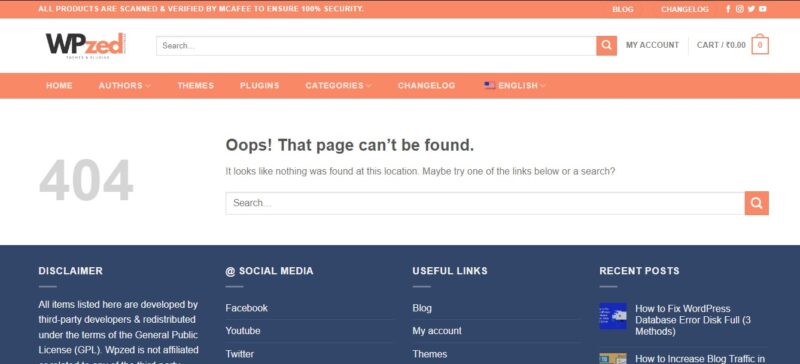
This offers a poor user experience and may negatively impact your SEO.
It may be that the web page was deleted, the page’s URL was changed, or the person who created the link simply typed the wrong URL.
Luckily, you can easily track 404 errors and redirect the URLs to pages that do exist.
With that being said, let’s take a look at how to redirect a page or URL in WordPress. We’ll cover two methods:
Method 1: Creating Redirects Using All in One SEO (AIOSEO)
The simplest way to redirect pages and URLs in WordPress is using the All in One SEO (AIOSEO) WordPress plugin. It’s the best SEO plugin for WordPress and offers a powerful Redirection Manager addon that makes it very easy to set up redirects.
Note: You will need AIOSEO Pro to use the redirection manager. There is also a free version of AIOSEO, but it doesn’t include 301 redirects.
The first thing you need to do is install and configure the AIOSEO Pro plugin on your website. For step-by-step directions, see our guide on how to set up All in One SEO correctly.
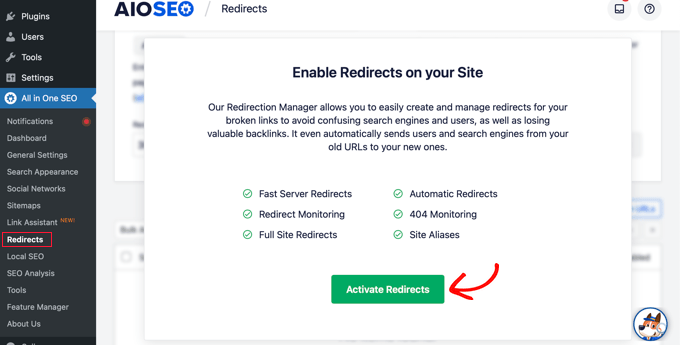
After that, you will need to activate the Redirect Manager addon. Simply go to All in One SEO » Redirects and click the ‘Activate Redirects’ button.
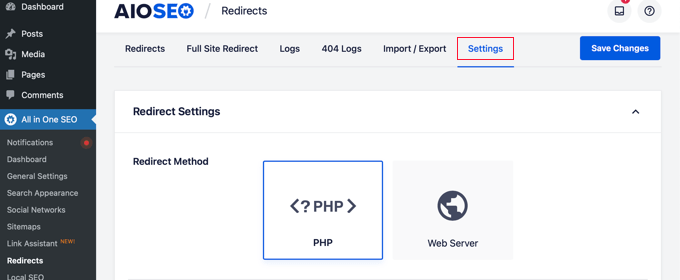
Finally, you will need to click on the ‘Settings’ tab to select a redirect method.
We recommend the ‘PHP’ option because it is the simplest and doesn’t require technical configuration of your web server.
Now you are ready to redirect your WordPress pages. You can do this using the AIOSEO Redirection Manager or the WordPress content editor.
Creating a Redirect From the AIOSEO Redirection Manager
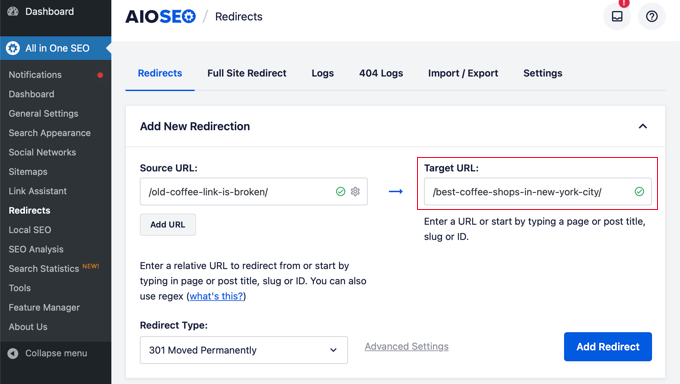
While you are still on the All in One SEO » Redirects page, you can navigate back to the ‘Redirects’ tab. This page lets you manage your redirects and add new ones.
To add a new redirect, you need to add the post slug of the URL that isn’t working. The slug is the part of the URL that comes after your website’s domain name.
Let’s look at an example. The full URL of a post or page looks like this:
https://example.com/old-coffee-link-is-broken/ |
In this case, the post slug is the last section of the URL:
/old-coffee-link-is-broken/ |
You need to type or paste the post slug of the broken link in the ‘Source URL’ field like this:

Tip: You can redirect multiple source URLs to the same target URL. Simply click the ‘Add URL’ button to add an extra ‘Source URL’ field.
Next, you need to enter the post slug of the existing page that you wish to redirect the URL to. You need to type or paste this into the ’Target URL’ field.
Alternatively, you can simply type part of the page’s title and AIOSEO will show a list of matching posts and pages.
Once you click on the correct post, the slug will be entered for you.

The last step is to choose a redirect type.
Make sure that the ‘301 Moved Permanently’ redirect type is selected and then click the ‘Add Redirect’ button.

Now, you can scroll down to view a log of the redirects you have created.
The ‘Hits’ column shows the number of people who visited the redirected link, and there is a toggle option to enable or disable individual 301 redirects.

Creating a Redirect From the WordPress Content Editor
You can also use All in One SEO to redirect a published post or page while you are editing it.
When you scroll to the bottom of the WordPress editor, you will find an AIOSEO Settings section. You need to click the ‘Redirects’ tab.
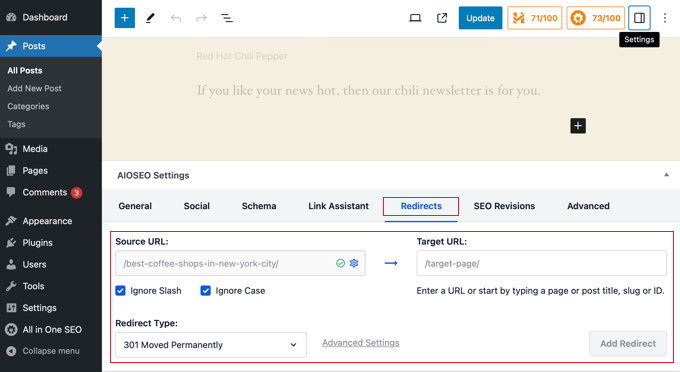
Here you will find the same redirection options that we covered above. The source URL has been filled in for you, and you need to add the target URL.
After that, make sure the ‘301 Moved Permanently’ redirect type is selected, and then click the ‘Add Redirect’ button.
A useful All-in-One SEO feature is that if you change a post’s permalink while editing it, AIOSEO will automatically redirect the old URL to the new one.
Method 2: Creating Redirects Manually by Editing .htaccess
You can also redirect a page or URL without using a plugin. To do that, you need to manually add code to your website’s .htaccess file. This method is not suitable for beginners because a small mistake can break your website.
Before using this method, we strongly recommend making a backup of your .htaccess file.
After that, you can make changes to the file using All in One SEO’s editor tool or edit it directly using FTP or your hosting provider’s file manager.
Editing .htaccess Using All in One SEO’s .htaccess Editor
The All in One SEO plugin offers an easy way to edit your .htaccess file. However, you will need All in One SEO Pro to use the .htaccess editor.
Once you have installed and configured AIOSEO, simply navigate to the All in One SEO » Tools page. Next, you should switch to the ‘.htaccess Editor’ tab.
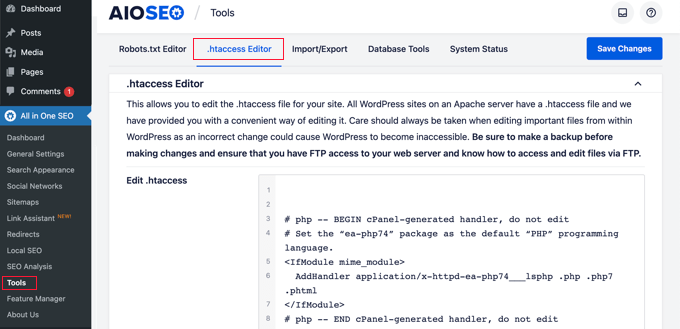
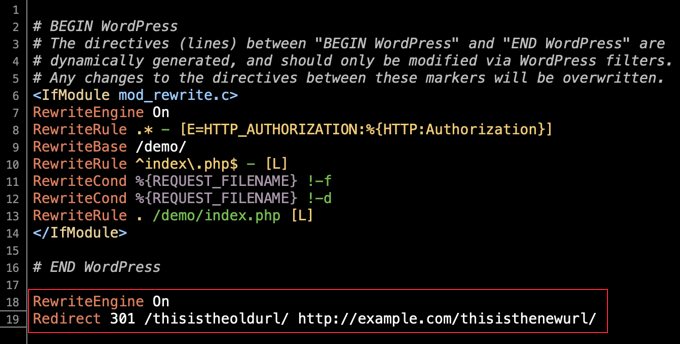
This page will show the contents of your .htaccess file. You need to paste your redirect code at the bottom of the file after the ‘# END WordPress’ line.
Here is a simple redirect where we are trying to send a user visiting an old post to a new post.
|
1
2
|
RewriteEngine OnRedirect 301 /thisistheoldurl/ http://yoursite.com/thisisthenewurl/ |
Make sure you change the old post and new post URLs.
Once you have done this, click the ‘Save Changes’ button at the top of the page to update the .htaccess file with the new code.
Editing .htaccess Directly
You can also edit the .htaccess file directly without the need for a plugin. To do this, you need to connect to your website using an FTP client or your hosting provider’s file manager.
You will find the .htaccess file in your website’s root directory. If you don’t see it there, then refer to our guide on why you can’t find .htaccess file on your WordPress site.
You may be able to edit the file using the file manager’s Edit feature. Otherwise, you can download .htaccess to your computer and edit it using a text editor like Notepad.
You should paste the following redirect code at the end of your .htaccess file after the ‘# END WordPress’ line.
|
1
2
|
RewriteEngine OnRedirect 301 /thisistheoldurl/ http://yoursite.com/thisisthenewurl/ |
Don’t forget to change the old post and new post URLs.
Make sure you save your changes, and if necessary, upload the .htaccess file back to the server.
Now, you can test your redirect to make sure it is redirecting properly as you intended.
Conclusion
Redirecting pages or URLs in WordPress is an essential practice for maintaining a seamless user experience, preserving your SEO rankings, and preventing lost traffic. Whether you choose to use a plugin for simplicity or edit the .htaccess file directly for more control, the process is straightforward and effective.
By following the steps outlined in this article, you can ensure that your visitors are always directed to the correct content, avoiding frustrating error messages and dead ends. Remember to carefully update the old and new URLs and test your redirects to confirm they are working as intended.
Maintaining an error-free website not only keeps your visitors happy but also helps in maintaining your site’s credibility and search engine performance. Stay proactive in managing your links, and your WordPress site will continue to thrive.