WordPress Tutorials
How to Add Custom JavaScript in WordPress (5 Methods)
Jun
Last Updated on June 26, 2024 by Jérôme Kerviel
In the past, if you wanted to add custom JavaScript in WordPress posts, you had to either be familiar with code or you had to rely on a plugin. Unfortunately, neither of those solutions were ideal for the vast majority of WordPress users. The first one had a high barrier to entry and was risky if you didn’t know what you were doing, and the second one was very limited in what it allowed you to do.
Fortunately, thanks to the development of AI tools, we no longer have to rely on those methods.
In this tutorial, I will show you five unique ways to add JavaScript to WordPress. I’ll also share the code snippet for each example so that you can use the ones you like on your own website. Afterwards, I’ll provide you with some guidance on how you can use the free version of Claude-3 (or any similar AI tool) to generate your own custom JavaScript functionalities.
Let’s get to work!
How to use this tutorial
Although this article contains a lot of code, I want to make it clear that you don’t need to have a single morsel of coding knowledge to take advantage of the information I’m going to share.
For each example, I will demonstrate what it looks and behaves like, and then I’ll share the underlying code that is responsible for the effect. To use it yourself, all you have to do is:
- Copy the code
- Go into whatever WordPress page or post that you’re working on where you’d like to use it
- Add a Custom HTML block (like in the image below)
- Paste the code into the block
- Modify the code according to your needs

With regard to the last bullet point, if you have at least a light background in HTML and / or CSS then it will make it easier to customize the code, but thanks to AI tools it’s not a pre-requisite (more on this in a moment).
For all but one of them, I will present the JavaScript effect directly within the heading itself. This means that the underlying code snippet will contain <h3> tags, which denote that the text is a heading. If you prefer to use the effect in a normal paragraph, then you can simply substitute the <h3> and closing </h3> for <p> and </p> respectively.
Other than substituting your own text for the example text, this is the most basic adjustment that you will need to make. However, depending on the specific effect, you may want to alter the text alignment from left to center, adjust the font size, etc. The easiest way to do this if you have no background in coding, is:
- Copy the entire code snippet
- Paste it into either Claude-3 or ChatGPT
- Tell it to alter the code to achieve your desired result
When you get the edited code back, paste it into the Custom HTML block, and click the preview button on the top right of the WordPress editor to see what it will look like on the front end of your site:
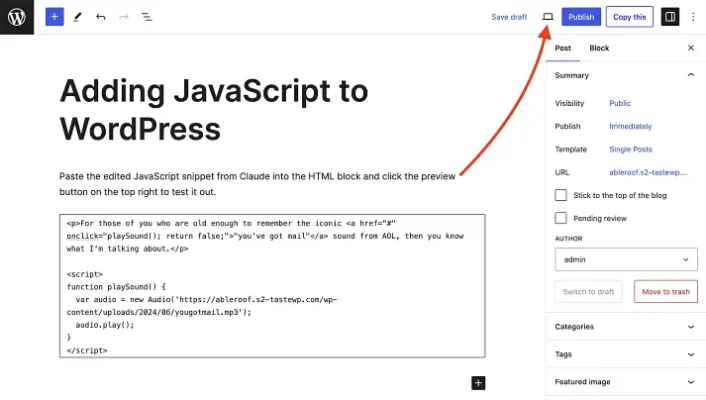
If you’re satisfied – great! If you’re not, ask Claude or GPT to edit it some more. Better yet, ask what specific parameter is being tweaked so you can just do it yourself until you achieve your desired result. Often times, both tools will tell you this without even asking, but I’m mentioning it just in case that doesn’t happen.
With that out of the way, let’s move on to the examples.
5 ways to use Custom JavaScript in WordPress (with snippets)
You can use JavaScript to do a lot of really interesting and useful things that will make your posts more engaging. Although the possibilities are quite vast, I’m going to stick to simple use cases here.
For the last example, you’ll need to take one additional step, but it’s not anything complicated or outside the bounds of common WordPress knowledge.
Example #1: Blur text and reveal it upon clicking
☝️ Click the blurred text to remove the blur.
Pretty cool, right? Here’s the underlying code snippet you can use to execute this effect:
<h3>Example #1: <span id="blurredText">Blur text and reveal it upon clicking</span></h3>

<script>
  const blurredText = document.getElementById('blurredText');

  blurredText.style.filter = 'blur(5px)';
  blurredText.style.cursor = 'pointer';

  blurredText.addEventListener('click', function() {
    if (blurredText.style.filter === 'blur(5px)') {
      blurredText.style.filter = 'none';
    } else {
      blurredText.style.filter = 'blur(5px)';
    }
  });
</script>
Just copy this into the Custom HTML block and then substitute “Blur text and reveal it upon clicking” with whatever text you want to blur. If the blurred text is part of a longer sentence, then the part before the blur effect should be inserted where you see “Example #1.” If there’s any text after the blurred section, you can put that after the closing </span> tag.
As mentioned in the previous section, please don’t forget to substitute the <h3> opening tag and the </h3> closing tag with <p> and </p> if you plan on using the effect inside of a normal paragraph.
If you get stuck or want to modify it in any other way, then ask Claude-3 or ChatGPT to do it for you.
Example #2: rmwacrlUns dso rdlobw edcaerabr som
☝️ Click the scrambled text to unscramble it.
This is a really neat concept that’s perfect for puzzles or on-page quizzes. Here’s the snippet to pull it off:
<h3>Example #2: <span id="scrambledPhrase">rUbcesanml a eamrblsdc drwo ro swrod</span></h3>

<script>
const scrambledPhrase = document.getElementById('scrambledPhrase');
const originalPhrase = 'Unscramble a scrambled word or words';
let unscrambledPhrase = originalPhrase.split('').sort(() => Math.random() > 0.5 ? 1 : -1).join('');

scrambledPhrase.textContent = unscrambledPhrase;
scrambledPhrase.style.cursor = 'pointer';
scrambledPhrase.addEventListener('click', function() {
  scrambledPhrase.textContent = originalPhrase;
});
</script>
Same idea here with the <h3> tags. If you want to scramble words in a regular paragraph, you’ll need to replace those with <p> tags.
The rUbcesanml a eamrblsdc drwo ro swrod is what unscrambles to say “Unscramble a scrambled word or words” so this is where you’ll put your own scrambled word or words.
To the right of const originalPhrase = is where you’ll put the unscrambled version.
If you don’t want to scramble the word(s) yourself, you can also use Claude-3 or ChatGPT to do this for you.
Example #3: Dynamically changing text
This snippet will cause a piece of text to change to another piece of text in time intervals chosen by you. You can also add a timer to indicate when the next change will take place, but this is optional.
The intervals can be set up however you want.
For example, if you wanted to give your audience a “daily tip” then you could set the interval to rotate every 24 hours. In the example below, I set it to rotate every three minutes and I included a notification for when it’s going to change next:
Tip: Start with simple snippets and build up your skills gradually. You’ll be amazed at what you can create!
If you hang out in this spot until the time you see above, you’ll see it change.
Keep in mind that you can edit this in so many other ways.
For example, in the original version that Claude-3 gave me, the tip looked exactly like the other surrounding text, so I asked it to modify the code by adding a yellow background with color #FFFBCC. I also asked it to change the notification from showing the last time the tip updated to showing the next time it will update.
I’m mentioning this to once again reiterate that you don’t need any coding background to use these snippets.
Simply copy the original JavaScript below, paste it into Claude or ChatGPT, and then ask it to make whatever adjustments you want. You’ll need to do this anyway, to substitute whatever rotating pieces of text you want to show your audience (unless you edit the code manually).
<style>
#dynamicTipContainer {
  background-color: #FFFBCC;
  padding: 10px;
  border-radius: 10px;
}
.tip-text {
  font-weight: bold;
  margin-bottom: 5px;
}
.next-update {
  font-size: 0.8em;
  color: #666;
  margin-bottom: 0;
}
</style>

<div id="dynamicTipContainer">
  <p class="tip-text"></p>
  <p class="next-update">Next Update: <span id="dynamicTipTimestamp"></span></p>
</div>

<script>
const tipTextElement = document.querySelector('#dynamicTipContainer .tip-text');
const dynamicTipTimestamp = document.getElementById('dynamicTipTimestamp');
const tips = [
  "Remember, there's often more than one way to write a JavaScript snippet. Don't be afraid to ask for clarification!",
  "Always preview your post before publishing to ensure the JavaScript snippet is working as intended.",
  "If you get stuck, feel free to ask for help or alternative approaches. There's no need to struggle alone!",
  "Don't be discouraged if your first attempt doesn't work. Coding takes practice and patience.",
  "Have fun with JavaScript! It's a powerful tool for adding interactivity to your WordPress posts.",
  "Start with simple snippets and build up your skills gradually. You'll be amazed at what you can create!",
  "Experiment! Try modifying the snippets and see how they behave differently.",
  "Remember, you can always undo changes or revert to a previous version if something goes wrong."
];

let nextUpdateTime;

function updateTip() {
  const currentTipIndex = Math.floor(Math.random() * tips.length);
  tipTextElement.textContent = "Tip: " + tips[currentTipIndex];

  // Set the next update time
  nextUpdateTime = new Date(Date.now() + 180000);
  updateTimestamp();
}

function updateTimestamp() {
  dynamicTipTimestamp.textContent = nextUpdateTime.toLocaleTimeString();

  // Update the timestamp every second
  setTimeout(updateTimestamp, 1000);
}

updateTip();
setInterval(updateTip, 180000); // Update every 3 minutes (180000 milliseconds)
</script>
⚠️ Important note: One thing to be aware of is that sometimes AI gets lazy when making code modifications. If you notice that for whatever reason your edited snippet isn’t previewing correctly on the front end, check the code for any notes that come after the double slashes //. For example, if you see something similar to the screenshot below, it means the AI didn’t include all of the original code:
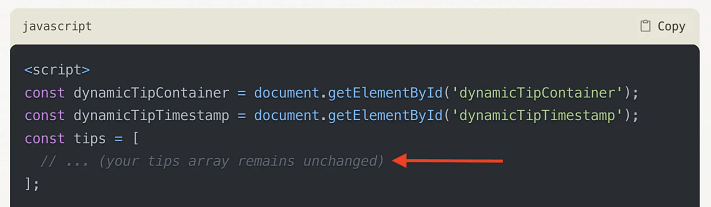
The solution is simple. Just ask it to give you back the entire code snippet with the modification and it’ll do it. Problem solved.
Example #4: Add a tooltip that appears on hover
☝️ Hover your mouse cursor over the heading text above to reveal the tooltip.
Tooltips in WordPress posts are useful for a number of reasons:
- Providing definitions without cluttering your main content
- Enhancing user engagement through interactive elements
- Offering additional information on complex topics directly where it’s needed
In the past, you’d have to rely on a plugin to use these, but now you can use your own custom JavaScript code to achieve the same effect.
Here is the base code snippet to get what you see above:
<h3><span id="tooltipText" class="tooltip">Example #4: Add a tooltip that appears on hover<span class="tooltiptext">When readers hover over specific words or phrases like this one, they'll be shown additional information.</span></span></h3>

<style>
.tooltip {
  position: relative;
  display: inline-block;
  cursor: help;
}

.tooltip .tooltiptext {
  visibility: hidden;
  width: 200px;
  background-color: #555;
  color: #fff;
  text-align: left;
  padding: 10px;
  border-radius: 6px;
  position: absolute;
  z-index: 1;
  bottom: 150%;
  left: 50%;
  margin-left: -100px;
  opacity: 0;
  transition: opacity 0.3s;
}

.tooltip:hover .tooltiptext {
  visibility: visible;
  opacity: 1;
}
</style>
Again, for any modifications, you can do them by hand if you feel comfortable, or put them into Claude-3 or ChatGPT.
⚠️ Another important note: The AI will generally attempt to fulfill whatever modification request you make, but this doesn’t always mean that it will work inside of WordPress. If you find that the edited JavaScript isn’t working and it has nothing to do with getting back incomplete code, then it might just be that your request isn’t possible.
Example #5: Add a click-on-play audio snippet to your text
☝️ Click the heading text above to play the audio snippet.
This particular example is exactly what I used JavaScript for in the two recent articles that I added it to.
Here is the snippet for it:
<style>
  .audio-link {
    font-weight: inherit;
    color: inherit;
    text-decoration: none;
    cursor: pointer;
  }
</style>

<h3><a href="javascript:void(0);" onclick="playMailSound()" class="audio-link">Example #5: Add a click-on-play audio snippet to your text</a></h3>
<audio id="mailSound" src="https://themeisle.com/blog/wp-content/uploads/2024/06/audio-snippet.mp3"></audio>
<script>
function playMailSound() {
  var sound = document.getElementById("mailSound");
  sound.play();
}
</script>
It’s unique compared to the others on the list because it requires an extra step to pull it off.
Since the piece of text being clicked is linked to an MP3 audio file, you first need to add the file to your WordPress media library.
To do this, go to the WordPress dashboard, then to Media → Add New Media File:
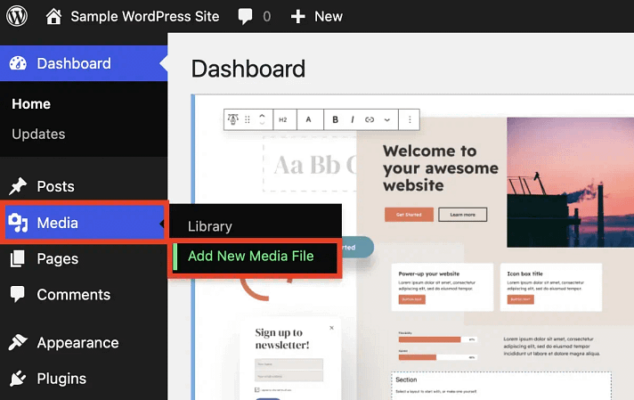
Find the MP3 file on your hard drive and upload it. Then click on Copy URL to clipboard:
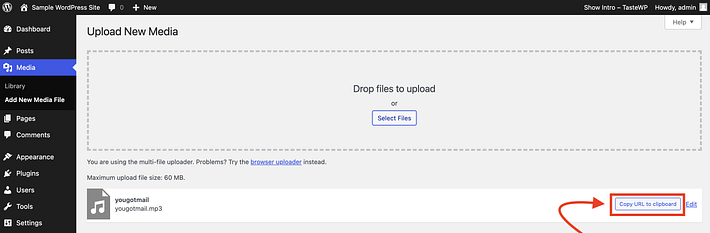
Now take this URL and paste it into the code snippet above, after the part that says <audio id="mailSound" src=.
Don’t forget to swap out the <h3> tags if you need to use this in a paragraph or a different heading class.
Tips to unlock other custom JavaScript in WordPress functions
As I stated earlier, JavaScript can do a lot of things in WordPress. The deeper you dive into it, the more you’ll realize that many of your favorite plugins rely heavily on JavaScript to do what they do. For example, when a plugin offers features like live updates, animations, form validations, or any kind of interactivity without a page reload, it’s usually JavaScript at work.
This doesn’t mean that you can (or should) all of a sudden forget all about wordpress plugins. However, it does mean that for many simpler use cases, you can avoid installing yet-another-plugin, and instead rely on JavaScript to do the job.
I only gave you five examples in this article, but there are lots more.
While the exact steps for each of them might have some nuanced differences, for simpler effects like the ones I covered in this article, you should be able to make them work with just the snippet and some minor editing. At most you might have to take an additional step or two like you saw with the play-on-click audio example.
Below are three tips to get the best results:
Tip #1: Use a good prompt to validate your idea and generate an initial snippet
This is straightforward. JavaScript can do a lot, but it can’t do everything. First make sure that what you’re trying to do is actually possible. The key to getting this right is to give Claude-3 (or whatever similar tool you’re using) a good initial prompt so that it communicates two things:
- Exactly what you want the JavaScript snippet to do
- That you are a beginner with no coding knowledge looking for the simplest possible solution
If what you’re asking to do is not possible with JavaScript, then Claude will inform you. Assuming it is possible, then it will most likely generate an initial snippet. This is also why it’s crucial to not overlook the importance of the second point.
In many cases, JavaScript can be used in more than one way to accomplish the same thing (more on this soon). This means that if you’re not being direct enough with your instructions, you might wind up with a solution that goes above your coding comprehension level (assuming your level is zero) or that works, but isn’t necessarily the best solution.
Tip #2: Don’t accept the first answer
The difficult aspect of generating custom JavaScript when you’re coming from a non-coding background, is that you won’t really know if what you’re being presented with is the best approach.
Let me give you an example.
I asked Claude-3 to generate me a JavaScript snippet like you saw in the fifth example I covered earlier – the play-on-click audio text. I worded the request so that it would identically match the real-life snippet that I already generated previously, for my article on gated content in WordPress.
It fulfilled my request. I tested it, and it worked just fine.
But then I noticed something. The code it gave me was different from the code that’s in the actual article. Even though both snippets work, I was curious why they were different. I asked Claude and this was its response:
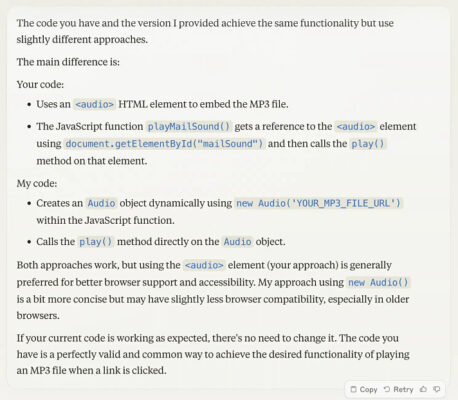
Even if you don’t understand the technicalities behind the explanation, you can understand the rationale.
But there is a deeper lesson to be learned here.
The lesson is that you can always follow-up with Claude (or whatever AI tool you’re using) to ask if the custom snippet provided is the only way to execute the JavaScript functionality you’re trying to do.
Alternatively, you can also use two AI tools simultaneously to see what each one gives you. If the results are different, then probe each one with the other one’s code.
In short, be a detective. Dig down until you find the best possible solution for your use case scenario.
Tip #3: Don’t be afraid to adapt and go with the flow
Lets say you decide to generate your first custom JavaScript snippet and you end up crafting a really good prompt. The prompt works and you end up with a solid initial snippet. So you decide to use it again. But then something happens – the response is not what you expected.
Don’t panic. This is normal. I’ll give you another example. Below is an initial prompt that I gave to Claude when generating one of the five snippets for the previous section of this article. Note Claude’s response:
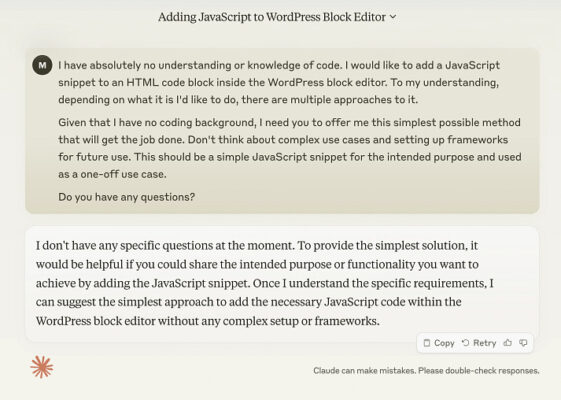
I copied and pasted the exact same prompt as a starting point for one of the other five snippet examples, but I got this as a response instead:
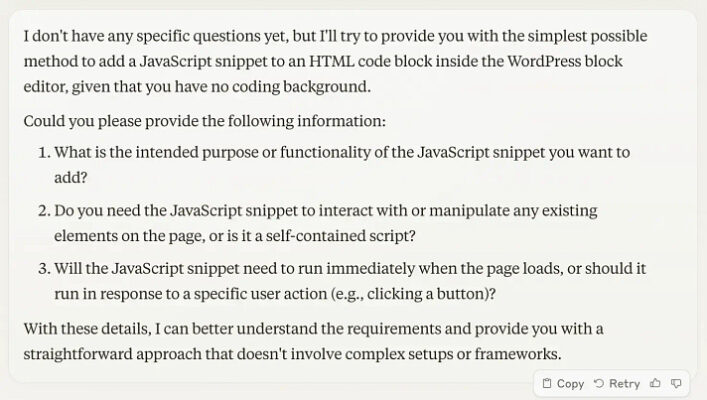
This time Claude decided to ask me some questions. Regardless of what questions it asks you (or doesn’t ask you), you can answer them to the best of your ability. If you know the answers, that’s great. If you don’t know, it’s also not a big deal. You can just be up front about that and have a conversation with Claude. It’ll adapt and eventually get to the bottom of what it is you’re asking it to do.
Parting thoughts
AI tools have changed the internet in many ways in a relatively short period of time. Although I have a lot of reservations about the way they are being misused to pump out low-quality content, on the flip side, they’ve made it a lot more accessible for WordPress users without a technical background to add interactive JavaScript elements to their site. While there are many ways to do this, we covered the following five (you can interact with them, just like earlier):
- Blur text and reveal it upon clicking
- baUscdo alnwblorrsmmeodwrd rr aec s
- Tip: JavaScript is fun! (changes every 3 minutes)
- Add a tooltip that appears on hover
- Add a click-on-play audio snippet to your text
For some other ideas, feel free to use either Claude-3, ChatGPT, or your favorite AI tool to generate your own custom snippets. Be sure to use a clear prompt with specific instructions, don’t accept the first answer the tool gives you without asking if there are other options, and finally, adapt to its responses as you would in a conversation with a human.