WordPress Security
How to Limit Login Attempts in WordPress
Last Updated on June 20, 2024 by Jérôme Kerviel
Limiting login attempts in WordPress is crucial for enhancing your website’s security. Here’s a step-by-step guide on how to do it:
While WordPress itself is a secure platform, this doesn’t make your site immune to break-ins. One of the most common attacks is human or bot hackers trying to force their way through your login page by trying various username and password combinations until something works. To keep them from succeeding, you can use a WordPress plugin to limit login attempts.
By restricting the number of attempts from a specific IP within a certain timeframe, you can block excessive access attempts, enhancing security.
This post will guide you on setting up this security feature with a free plugin, discussing its advantages and drawbacks. Let’s dive in!
1. Use a Security Plugin
One of the easiest ways to limit login attempts is by using a security plugin. Plugins like Wordfence, iThemes Security, or Limit Login Attempts Reloaded offer robust features to protect your site.
Steps:
- Install and activate the plugin of your choice.
- Navigate to the plugin settings.
- Configure the login attempt limits according to your preference (e.g., block an IP after three failed attempts).
for example Install the “Limit Login Attempts Reloaded” plugin
For most users, a WordPress limit login attempts plugin is the best option to restrict login attempts. There are several quality options, but we recommend the free Limit Login Attempts Reloaded plugin because it’s:
- It offers a free version.
- Popular – active on over 2 million sites, according to WordPress.org.
- Well-rated – 98%.
- Easy to use.
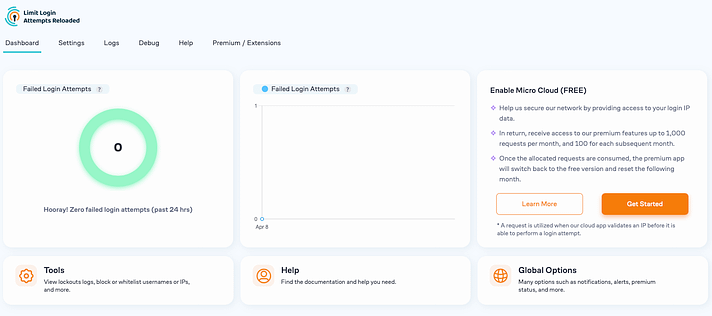
Once the plugin is activated, you can open it, and it will take you to the plugin’s dashboard. This is where you get a comprehensive overview, including the total number of failed login attempts from the past 24 hours and a settings panel.
Step 2: Customize the plugin’s settings
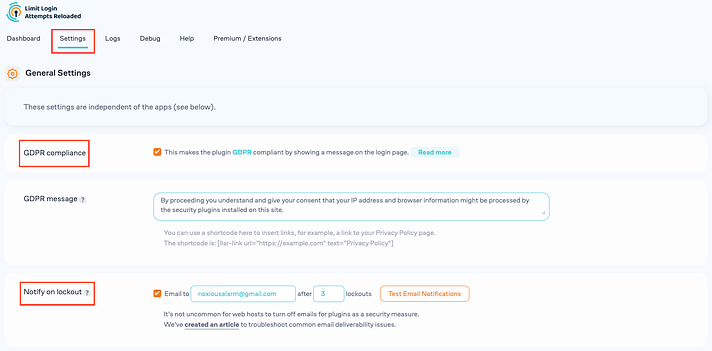
First off, head over to the “Settings” area. It’s a good idea to begin by selecting the “GDPR Compliance” checkbox right at the top. This will display a security message on your WordPress admin login page, keeping things transparent. Also, consider activating the “Notify on lockout” feature. By doing this, you’ll be informed via email whenever someone tries and fails to log in too many times, with the threshold for “too many login attempts” being entirely up to you.

Below this, the “Local App” section lets you fine-tune the rules around login attempts, including setting the number of attempts allowed before locking out, the duration a user is locked out following several failed attempts, and specifying the duration and increase of lockouts for persistent offenders.
If you’re not sure what the right setting should be, you can safely go with the default numbers there.

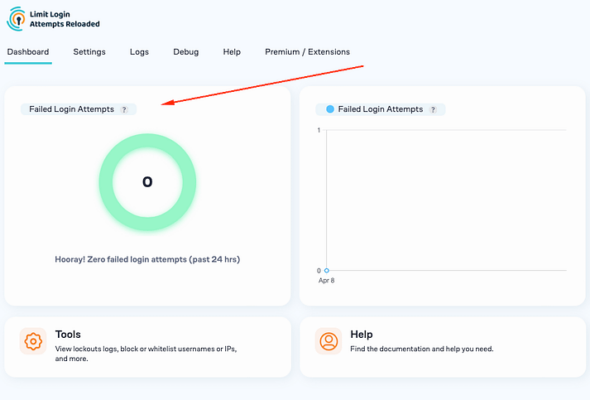
There’s no need to adjust the data found in the “Trusted IP Origins” fields so go ahead and click on “Save Settings“. To test if the plugin works, simply go to your website’s login page and enter the wrong login info. A message will be displayed saying that incorrect login credentials have been entered, as well as how many attempts you have left. An email will also be sent to your email address letting you know about the failed attempts. Of course, you can always check the failed login attempts on your dashboard, too:

What are the benefits of limiting login attempts?
Not all security techniques are right for every website, and this one does have both potential advantages and drawbacks. Let’s look at the benefits of limiting login attempts:
- It prevents humans and automated bots from being able to try hundreds (or thousands) of username/password combinations until they hit the right one.
- A temporary lockout is often enough to deter an attack, as the hacker or bot will move on to the next likely target.
- Most of your legitimate users will only need a single login attempt, or perhaps a few if they forget or mistype their credentials.
What about the drawbacks?
Implementing a wordpress plugin that limits login attempts is not without its challenges. Consider the following drawbacks:
- Adding a plugin to your site. While this plugin is very lightweight, this can put off site owners who want to keep their plugin counts down (for security or performance reasons).
- Of course, the drawback is that, every once in a while, a genuine user might struggle to log in and get themselves locked out.
2. Configure .htaccess File
For those who are comfortable with coding and have access to their server’s file system, modifying the .htaccess file is an effective way to limit login attempts and protect your WordPress site from brute force attacks. The .htaccess file is a powerful configuration file used by the Apache web server to control various server settings, including security configurations. Here’s a detailed guide on how to configure your .htaccess file to limit login attempts:
Steps to Modify .htaccess File:
1. Access Your Website’s Files
- Using FTP Client:
- Download and install an FTP client (such as FileZilla).
- Connect to your website’s server using your FTP credentials.
- Navigate to the root directory of your WordPress installation, typically named
public_htmlor similar.
- Using Hosting Control Panel:
- Log in to your web hosting control panel (such as cPanel).
- Use the File Manager tool to navigate to the root directory of your WordPress site.
2. Backup .htaccess File
Before making any changes, it’s crucial to create a backup of your current .htaccess file to ensure you can restore it if something goes wrong.
- Download the
.htaccessfile to your local computer using your FTP client or the hosting control panel’s File Manager.
3. Edit .htaccess File
Open the .htaccess file using a text editor (such as Notepad++ or the built-in editor in your hosting control panel).
4. Add Code to Limit Login Attempts
Add the following code snippet to the .htaccess file to limit login attempts:
<IfModule mod_rewrite.c>
RewriteEngine On
RewriteBase /
RewriteCond %{REQUEST_METHOD} POST
RewriteCond %{REQUEST_URI} ^(.*)?wp-login\.php(.*)$
RewriteCond %{REMOTE_ADDR} !^123\.456\.789\.000$
RewriteCond %{REMOTE_ADDR} !^111\.222\.333\.444$
RewriteCond %{REMOTE_ADDR} !^555\.666\.777\.888$
RewriteRule ^(.*)$ - [F,L]
</IfModule>
Explanation of the Code:
- RewriteEngine On: Enables the runtime rewriting engine.
- RewriteBase /: Sets the base URL for per-directory rewrites.
- RewriteCond %{REQUEST_METHOD} POST: Applies the rule only to POST requests (which are used for login attempts).
- RewriteCond %{REQUEST_URI} ^(.)?wp-login.php(.)$: Applies the rule to requests for the
wp-login.phpfile. - RewriteCond %{REMOTE_ADDR} !^123.456.789.000$: Excludes specific IP addresses from the rule. Replace
123.456.789.000with the actual IP addresses you want to allow access. Add as manyRewriteCondlines as needed for each allowed IP. - RewriteRule ^(.*)$ – [F,L]: Denies access (returns a 403 Forbidden status) and stops further rules from being processed.
5. Save and Upload the File
- Save the changes to the
.htaccessfile. - Upload the modified file back to your server using your FTP client or save it directly if using the hosting control panel’s editor.
6. Test the Changes
- Attempt to log in to your WordPress site from a non-allowed IP address to ensure that the rule is working correctly. You should receive a 403 Forbidden error.
- Verify that you can still log in from the allowed IP addresses.
Additional Tips:
- Whitelist Your IP: Always ensure that your IP address is whitelisted in the
.htaccessfile to prevent locking yourself out. - Dynamic IP Addresses: If your IP address changes frequently, consider using a VPN with a static IP or a service like DynDNS to maintain access.
- Regular Updates: Periodically review and update the .htaccess file to ensure it meets your security needs and accommodates any changes in IP addresses.
Modifying the .htaccess file to limit login attempts is a robust and flexible method to enhance the security of your WordPress site. While it requires some technical knowledge, the process is straightforward and provides an additional layer of protection against unauthorized access attempts. Always remember to back up your .htaccess file before making changes and test thoroughly to ensure your site remains accessible to authorized users.
Conclusion
Even though it’s not strictly required, choosing to install a plugin to limit login attempts is a smart, proactive step to safeguard your WordPress site. It’s a small investment of your time that pays off by fortifying your site against brute force attacks—a favorite tactic among hackers targeting WordPress’s generous user base.
Additionally, modifying the .htaccess file to limit login attempts is a robust and flexible method to enhance your site’s security. While this approach requires some technical knowledge, the process is straightforward and provides an extra layer of protection against unauthorized access attempts. Always remember to back up your .htaccess file before making changes and test thoroughly to ensure your site remains accessible to authorized users. Combining both methods—using a plugin and configuring the .htaccess file—can offer comprehensive security for your WordPress site.

